1.1 Running the Board (The Arrakis Mark-15)
This guide will cover the basic skills you will need to know in order to run your show. Since every show is different (people talk, play CD, records, mp3s, and more…) you don’t have the be an expert in using all of the equipment to get started but you should be comfortable using the Board, the Studio PC, the Mic and at least one other input method (CD players, Turntables, Laptop Line in, etc.) and you should be familiar with the other methods in case the need arises.
Try not to get intimidated by all the buttons, lights, and sliders—for many DJs you only need to know a few basic functions to get your shown on the air. The board mixes audio from multiple input sources to control what goes out over the air.
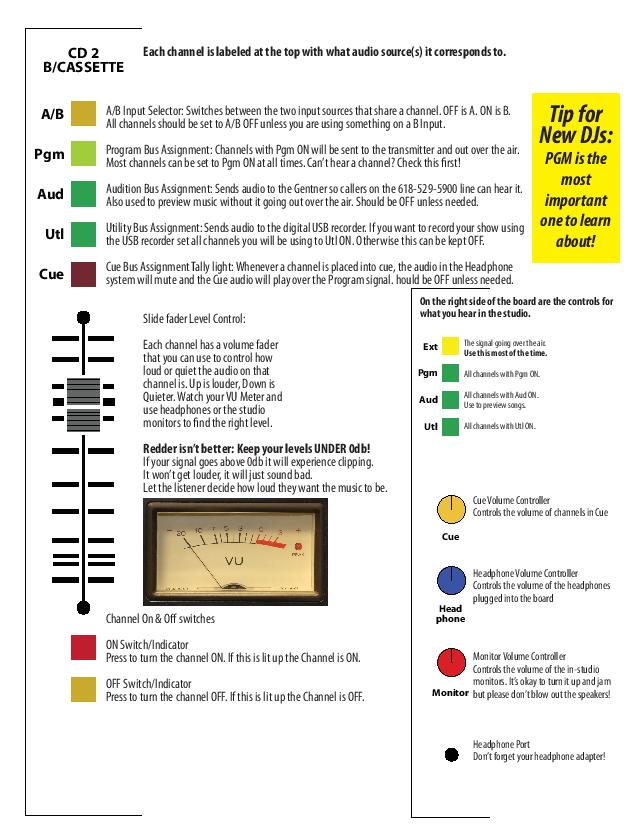
Channels: A Channel is an audio source that can be mixed using the board. Each Channel is labeled at the top of the board with the source device or input such as “Mic 1” or “CD 3”.
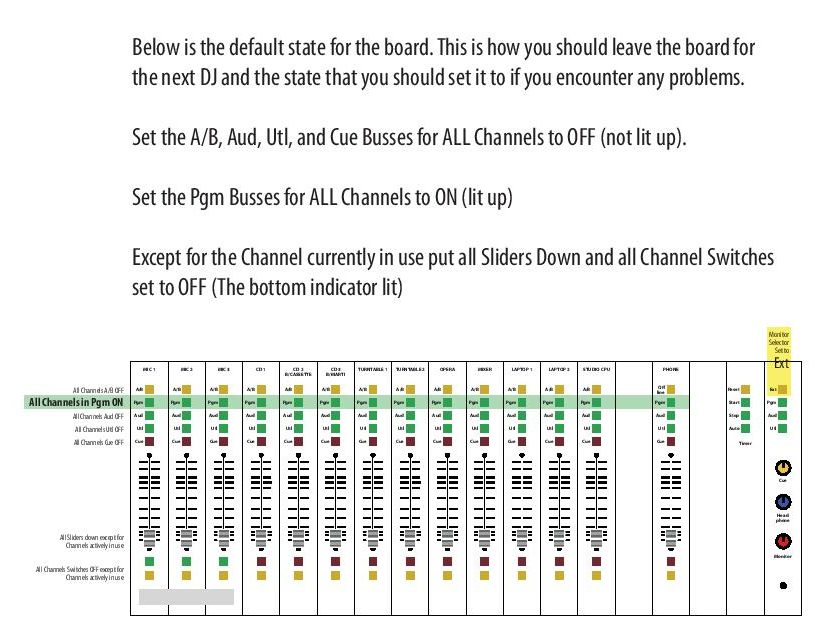
Busses: Each Channel has a set of controls called ‘busses’ which control where the audio signal from that channel is sent. Pgm or Program is the most used bus—It sends the audio signal to the transmitter to be broadcast over the air. Unless you have a specific reason why you are using other busses it is safest to always keep all Channels set so that the Pgm bus is ON (lit up) and all other busses are OFF (not lit up). If you change the bus settings during your show you should always change the settings back to the default values when you are done so the next DJ doesn’t get confused.
To broadcast an audio source over the air all of the following things need to happen:
- The Channel must be in Pgm ON. The green light labeled Pgm on the channel you are using should be lit up.
- The Channel must be Switched ON. At the bottom of each channel are two switches / indicator lights. The bottom button/light (yellow) can be pressed to set the Channel to OFF and mute all sound from that Channel. The upper button/light (green for Mics, red for everything else) can be pressed to switch the Channel ON adding that audio source into the mix. When the top Channel Switch light is on the Channel is ON (also called, ‘live’ or ‘hot’).
- The Channel Volume Slider must be UP: The Channel Volume Slider controls how loud or quiet an audio source is in the mix. Use it to fade songs in and out, adjust up when you have a quiet source, down when the source is loud or if you want to talk over it. Using headphones and watching the VU meter is the best way to monitor your mix, the in-studio monitors can be deceptive and are not active when using a Mic.
The Audio Source must be Playing: The audio source needs to be sending a good signal. This can be as simple as hitting play on a CD player or talking close enough to the Mic but if you are using a device that has its own volume controls (like a mixer or laptop) make sure that the volume is turned up in your system volume settings as well as your software volume settings (some devices mute audio when headphones are plugged in or unplugged).